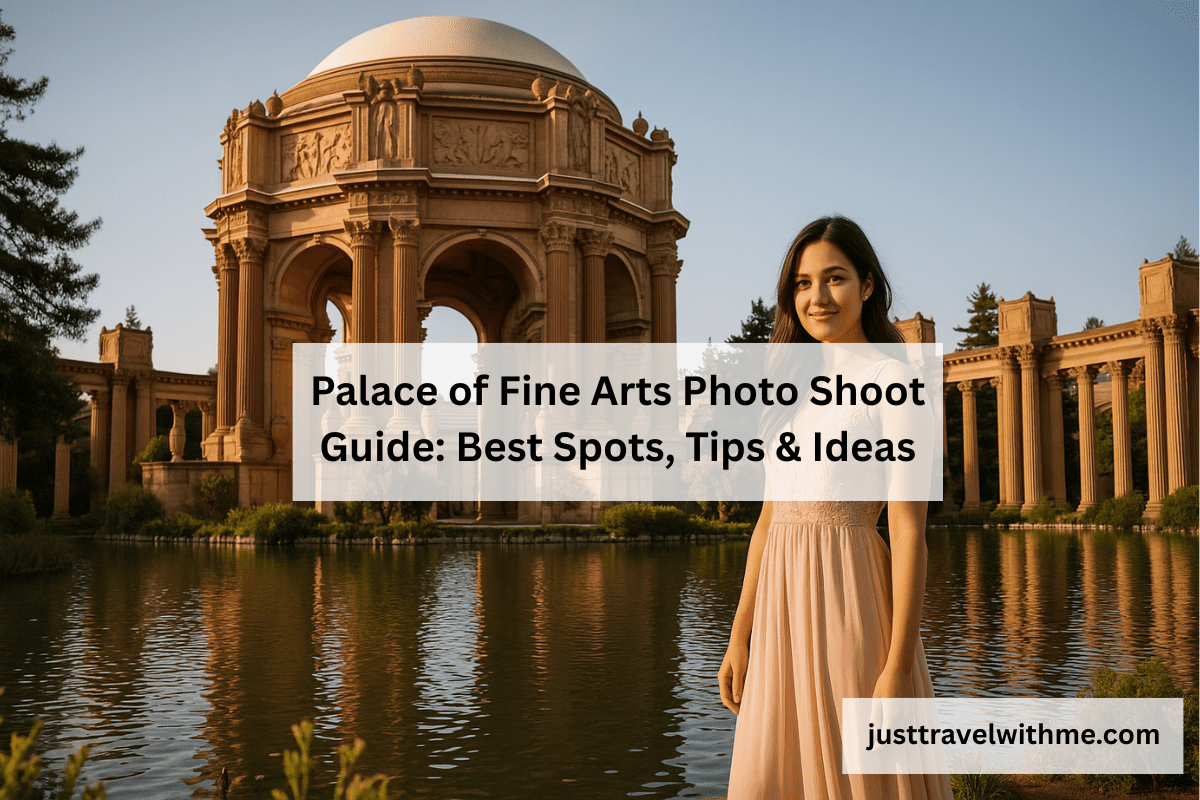
The Palace of Fine Arts in San Francisco is one of those rare places that feels almost timeless. With its towering rotunda, graceful colonnades, and serene lagoon, it offers a backdrop that combines both architectural elegance and natural beauty. That’s why so many photographers, couples, families, and even artists choose this spot for a Palace of Fine Arts photo shoot. Whether it’s an engagement session, a wedding portrait, or simply a family day out captured on camera, this location has a charm that works for every occasion.
In this guide, I’ll walk you through everything you need to know before planning a shoot here. From the best spots around the rotunda and lagoon to the ideal times of day for flattering light, we’ll explore how to make the most of this iconic landmark. I’ll also share creative themes, expert photography tips, and family-friendly advice that can help you create images that feel personal, timeless, and truly unforgettable.
Palace of Fine Arts: Quick Overview
The Palace of Fine Arts isn’t just another landmark in San Francisco—it’s a piece of living history. Built in 1915 for the Panama-Pacific Exposition, the structure was designed in a Greco-Roman style that still captivates visitors more than a century later. The massive rotunda, with its high dome and carved details, looks almost like it was lifted from ancient Rome. Surrounding it are long colonnades lined with Corinthian columns, which lead you toward the calm waters of the lagoon. The gardens and open green spaces give balance to the stone architecture, making it a perfect mix of man-made elegance and natural serenity. Inside the grounds, you’ll also find the Palace of Fine Arts Theatre, a working venue that still hosts performances, exhibitions, and cultural events.
From a photographer’s point of view, this layout is a dream. You have wide open spaces, dramatic architecture, reflective water surfaces, and softer natural elements all in one location. Whether you want to frame a couple under the arches, capture the reflection of the dome in the lagoon, or shoot candid family portraits along the tree-lined paths, the options are endless.
Accessibility, however, is something to keep in mind. The Palace is a popular tourist attraction, so weekends and afternoons often get busy with visitors. Parking can be limited, especially when events are scheduled at the theatre. Public transport is available, but arriving early usually makes the experience smoother.
It’s also worth noting that upcoming events at the Palace of Fine Arts can directly affect your photo shoot plans. Large events bring more people, and in some cases, sections of the venue may be reserved or closed off. Checking the official event calendar before scheduling your shoot helps avoid surprises and ensures you have full access to the best spots.
Planning Your Photo Shoot
Careful planning is what separates a good photo shoot from a great one, especially at a busy landmark like the Palace of Fine Arts. From scouting the location to choosing the right time of day, every detail can influence the final results. Here’s how to prepare like a professional.
3.1 Scouting the Location
Visiting the site before your scheduled shoot is one of the smartest moves you can make. Walk around the grounds, study the layout, and note where the light falls at different times of day. Reviewing maps and browsing recent photos on social media platforms like Instagram or Pinterest can also give you an idea of how others have used the space—but don’t stop there. Look for unique angles that can help your images stand out, such as the curves of the rotunda reflected in the lagoon or the play of shadows along the colonnades.
The location offers several key backdrops worth exploring: the dramatic dome of the rotunda, the calm lagoon with its mirror-like reflections, the towering columns, and the shaded garden walkways. Each spot provides a different mood, making it easy to create a varied collection of photos in a single session. Before heading out, also take a few minutes to check the weather forecast, local fog conditions, and the Palace’s event calendar so you can anticipate any changes that may affect your shoot.
3.2 Timing Matters
Crowds are one of the biggest challenges at the Palace of Fine Arts. If you want more privacy and cleaner backgrounds, aim for a weekday morning. The light is softer, the atmosphere quieter, and you’ll have more freedom to move around without distractions.
For photographers chasing that golden, cinematic glow, nothing beats the golden hour. The hour just after sunrise or before sunset casts a warm, soft light that enhances the natural tones of the stone columns and the water’s surface. It’s the perfect time for romantic portraits or dramatic wide shots.
If you’re after something moodier, consider shooting during blue hour—the short window after sunset when the sky deepens into rich blues and the building lights start to glow. Night photography here can be especially magical, with the illuminated dome reflecting off the lagoon like a painting.
3.3 Permits and Logistics
In most cases, casual photo shoots don’t require permits. Engagements, family portraits, or small group sessions can usually be done without official paperwork. However, if you’re planning a large wedding shoot, a commercial production, or anything involving significant equipment, it’s best to check with city officials or the venue in advance.
Parking can be tricky, particularly on weekends or when an event is happening at the theater. Arriving early not only helps secure a spot but also gives you extra time to set up and get comfortable with the location. As with any outdoor shoot, always have a backup plan. A sudden change in weather or an unexpected event might limit access to certain areas, so keeping an alternate location or a flexible schedule in mind ensures the day runs smoothly.
Best Spots and Composition Ideas
The Palace of Fine Arts is filled with locations that inspire creativity, each offering unique angles and moods for photography. Whether you’re working with a couple, a family, or just exploring artistic shots, here are the best areas and how to use them.
4.1 The Rotunda
The rotunda is the centerpiece of the Palace, and it never fails to impress on camera. Wide-angle lenses work beautifully here, capturing the symmetry of the dome, columns, and arches. If you want a more dramatic perspective, try a low-angle shot that emphasizes the scale and grandeur of the architecture. Don’t forget the details—the carvings, sculptural elements, and reflections in the lagoon nearby add texture and depth to your images.
4.2 Colonnades and Walkways
The colonnades are perfect for creating leading lines and vanishing point compositions. Place your subject in the center of the walkway and let the tall columns guide the viewer’s eye straight to them. During certain times of day, sunlight cuts through the arches, casting bold patterns of light and shadow that can be used for striking portraits. You can also use the arches themselves as natural frames, positioning your subject just inside to add depth and structure to your photos.
4.3 Lagoon and Gardens
The lagoon is one of the most versatile spots for creative shooting. On calm days, the water becomes a natural mirror, reflecting the dome and arches in a way that feels cinematic. Add interest by including foreground elements like reeds, overhanging branches, or pathways leading toward the water. For something more artistic, experiment with motion blur—capturing the ripples of the water or a person walking along the edge can create a sense of movement in an otherwise still scene.
4.4 Hidden Corners
Beyond the main structures, the Palace has plenty of quieter spots that are ideal for intimate portraits. Shaded garden paths, tucked-away benches, and seasonal flowers offer softer, more personal backdrops. These corners are especially helpful for family shoots or couples who prefer a more private atmosphere away from the crowds. They also allow you to balance the grandeur of the architecture with moments of quiet simplicity.
4.5 Palace of Fine Arts at Night
When the sun sets, the Palace transforms into something almost magical. The dome and columns are lit with warm lights that glow against the deepening sky, and the reflections in the lagoon double the effect. For night shoots, long exposures can capture the richness of the scene—smooth water, glowing lights, and even stars if the sky is clear. If you’re working with people, bring portable lighting like an LED panel or off-camera flash to gently illuminate your subjects while still keeping the building’s dramatic night glow in the frame.
Creative Shoot Themes
The Palace of Fine Arts isn’t just a beautiful backdrop—it’s a setting that adapts to almost any style of photography. Whether you’re capturing romance, family moments, or artistic concepts, the space offers endless creative opportunities. Here are some popular themes to consider.
5.1 Engagements and Couples
Few places in San Francisco feel as romantic as the Palace during golden hour. The warm light softens the stone columns and casts a gentle glow across the lagoon, creating the perfect stage for engagement or couple portraits. Beyond the posed shots, candid interactions often feel the most genuine—walking hand in hand, laughing together under the arches, or simply pausing to take in the view. Props can add variety and movement: a flowing scarf or light fabric can catch the breeze, while a simple umbrella creates playful charm on cloudy days.
5.2 Families and New Parents
For families, especially those with young children, the Palace offers both grandeur and a sense of openness that makes shoots relaxed and natural. Gentle, candid shots of kids playing or parents holding their baby by the lagoon often capture authentic moments. Strollers along the tree-lined paths or a family seated in a circle under the grand archways make for timeless compositions. These scenes balance the scale of the architecture with the intimacy of family connection.
5.3 Weddings and Bridal Portraits
Brides and grooms often choose the Palace of Fine Arts for wedding portraits because it feels dramatic yet romantic. A bridal gown flowing under the rotunda arches instantly looks iconic, while silhouettes captured at sunset against the dome are striking and elegant. Detail shots also work beautifully here—imagine a close-up of a bouquet set against the carved stone columns, or a pair of shoes placed on the steps of the colonnades. These smaller moments highlight the artistry of the architecture while keeping the focus personal.
5.4 Fine Art Photography
For photographers interested in more experimental or artistic work, the Palace provides endless inspiration. Black and white photography can highlight the strong contrasts between the columns, arches, and shadows, giving the space a timeless, almost classical mood. Minimalist framing—such as isolating one arch or focusing on the repetition of details—creates abstract compositions. Long exposures can transform moving elements like water or passing people into artistic blurs, turning the Palace into more than just a backdrop—it becomes part of the artwork itself.
Practical Tips
Shooting at the Palace of Fine Arts can be a rewarding experience, but like any outdoor session, it comes with its own challenges. Here are some practical tips that will help you prepare and ensure everything runs smoothly.
6.1 Gear Essentials
Having the right gear makes a big difference. A wide-angle lens is excellent for capturing the scale of the rotunda and colonnades, while a 50mm or 85mm prime lens gives you beautiful portraits with soft background blur. A tripod is essential for night shoots or long exposures, especially if you want to capture reflections in the lagoon without camera shake. Filters can also be handy—use a polarizer to cut glare on the water or enhance the sky, and bring a neutral density (ND) filter if you want to experiment with creative long exposures during the day.
6.2 Managing Crowds
Since the Palace is one of San Francisco’s most visited landmarks, it’s rare to have it completely to yourself. The best way to minimize crowds is to shoot on a weekday morning or near sunrise. If people still wander into your frame, use a shallow depth of field to blur them into the background. Another option is to embrace the environment—sometimes including people in your shots adds scale and a sense of life to the scene. A couple standing against the grand arches looks even more impressive when you see the contrast with passing visitors.
6.3 Weather and Lighting
San Francisco’s weather can change quickly, so flexibility is key. Foggy days often bring soft, diffused light that flatters faces and reduces harsh shadows. On bright, sunny afternoons, use shaded areas under the colonnades or arches to avoid unflattering overhead light. Golden hour, both at sunrise and sunset, is the ideal time for glowing, romantic tones—but it passes quickly. Have a clear plan for the order of shots so you can make the most of that limited window.
6.4 Client Comfort
A comfortable client is always a more relaxed subject. Carry small essentials like bottled water, snacks, light jackets, or even an extra pair of shoes if there’s a lot of walking involved. Encourage outfit changes if time allows—this adds variety to the final gallery and keeps clients engaged. Most importantly, maintain open communication. Let them know what to expect at each location, keep the atmosphere light, and adjust based on their comfort level. A relaxed client naturally results in better, more authentic photos.
Sample Photo Shoot Itinerary
To make the most of your time at the Palace of Fine Arts, it helps to have a clear schedule in mind. Here are two sample itineraries—one for morning light and one for the evening glow.
Morning Plan
- 8:00 AM – Arrive early to secure parking and enjoy the quiet atmosphere. Begin with wide shots of the rotunda before the crowds arrive.
- 8:20 AM – Move toward the lagoon for reflection photos while the water is calm. Capture both wide landscapes and closer portraits.
- 8:45 AM – Quick outfit change or styling touch-up. Transition to the garden paths and shaded areas for softer, candid shots.
- 9:30 AM – Wrap up with family or couple portraits along the walkways before the location gets busier. Finish by 10 AM.
Evening Plan
- 4:30 PM – Arrive and begin with portraits near the rotunda and colonnades, taking advantage of the softer afternoon light.
- 5:15 PM – Capture golden hour portraits with warm tones reflecting on the architecture and lagoon. Include candid walking shots and detail images.
- 6:00 PM – Shift to the lagoon edge for reflection shots as the light deepens. Add a few romantic silhouettes against the sky.
- 6:30–7:00 PM – As night falls, use long exposures to highlight the illuminated dome and colonnades. Add creative portraits with portable lighting before wrapping up.
This type of itinerary keeps the session organized, ensures you capture a variety of looks, and makes the most of the changing light throughout the day.
Expert Photographer Tips
Even with the perfect location, great photos depend on preparation and adaptability. As a professional photographer, here are a few tried-and-true tips that will make your Palace of Fine Arts photo shoot smoother and more successful.
- Arrive early to test lighting and angles. Light changes quickly, especially around sunrise and sunset. Getting there ahead of time gives you space to explore the grounds, take a few test shots, and find the best positions before your clients arrive.
- Bring both wide and portrait lenses. A wide-angle lens allows you to capture the grandeur of the rotunda and colonnades, while a 50mm or 85mm lens is perfect for intimate portraits with soft background blur. Switching between the two ensures a balanced mix of dramatic and personal images.
- Encourage natural interaction instead of stiff posing. The Palace provides a formal backdrop, but the best images often come from candid moments—laughter, walking hand in hand, or playful interactions. Prompt your clients with gentle direction rather than rigid poses to keep the session relaxed and authentic.
- Stay flexible with weather and crowds. San Francisco’s fog, shifting light, or sudden tourist groups are all part of the experience. Instead of letting these factors interrupt your shoot, use them creatively. Fog can create a dreamy mood, and even a passing crowd can add context and scale to your images. Flexibility is the key to capturing the most natural and memorable photos.
Conclusion
The Palace of Fine Arts is more than just a San Francisco landmark—it’s a stage where architecture, water, and light come together to create unforgettable backdrops. Whether you’re planning an engagement session, wedding portraits, a family shoot, or even fine art photography, the setting offers endless opportunities for creativity. Its combination of grandeur and intimacy makes it versatile enough for both personal moments and dramatic compositions.
With thoughtful planning—choosing the right time, scouting the best spots, and staying flexible with weather or crowds—you can make the most of this iconic location. If you’re looking for a place that blends elegance, history, and natural beauty, a Palace of Fine Arts photo shoot is hard to beat. Start planning with confidence, and you’ll walk away with images that feel timeless and truly your own.







Leave a Reply
View Comments